Learn to Automate Excel like a Pro with PowerShell
Everyone wants to produce slick looking reports. Want to impress management? Use PowerShell and Install-Module -Name ImportExcel.
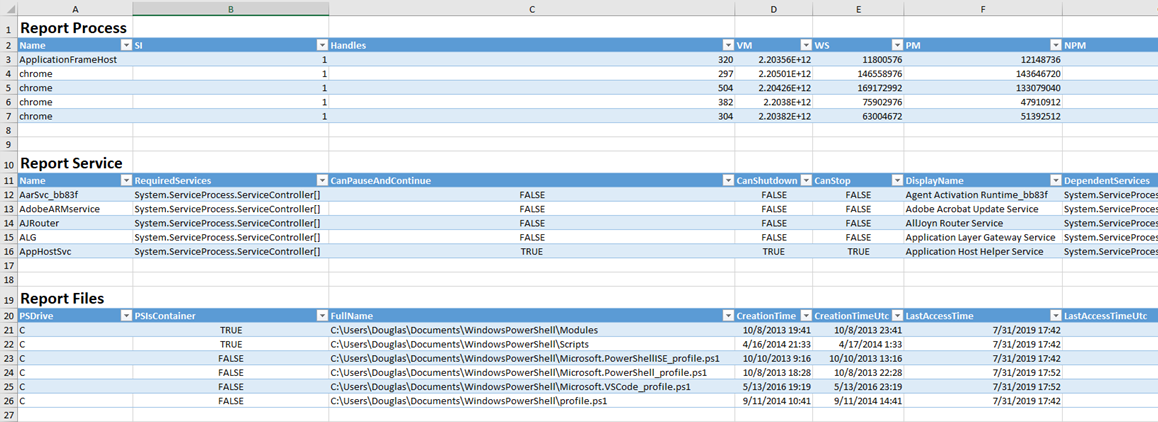
Here’s Get-Process, Get-Service and a directory listing all in one Excel spreadsheet format as a report, plus, it is interactive.

The Export-Excel PowerShell function works on the same way you expect Out-GridView to work, except, you get an Excel worksheet when you’re done.
Read on to see how easy it is to do, and the bonus feature at the end.
The PowerShell Code
To pull this together you need my PowerShell module from the PowerShell Gallery. If you want to view the results, you also need Microsoft Excel installed.
Note: You can produce this same report with out having Excel installed. It’s a great feature if you want to run the data collection process unattended or on a server. Then you can email the result or store it on a file share.
Install the PowerShell module from the gallery
Install-Module -Name ImportExcel
Now you’re ready to run the script and get the results.
The output of Get-Process, Get-Service, and Get-ChildItem are piped to Excel, to the same workbook $xlfile.
By not specifying a -WorkSheetName, Export-Excel will insert the data to the same sheet, in this case the default Sheet1.
$xlfile = "$env:TEMP\PSreports.xlsx"
Remove-Item $xlfile -ErrorAction SilentlyContinue

# Get-Process
Get-Process | Select -First 5 |
    Export-Excel $xlfile -AutoSize -StartRow 2 -TableName ReportProcess

# Get-Service
Get-Service | Select -First 5 |
    Export-Excel $xlfile -AutoSize -StartRow 11 -TableName ReportService

# Directory Listing
$excel = Get-ChildItem $env:HOMEPATH\Documents\WindowsPowerShell |
    Select PSDRive, PSIsC*, FullName, *time* |
    Export-Excel $xlfile -AutoSize -StartRow 20 -TableName ReportFiles -PassThru

# Get the sheet named Sheet1
$ws = $excel.Workbook.Worksheets['Sheet1']

# Create a hashtable with a few properties
# that you'll splat on Set-Format
$xlParams = @{WorkSheet=$ws;Bold=$true;FontSize=18;AutoSize=$true}

# Create the headings in the Excel worksheet
Set-Format -Range A1  -Value "Report Process" @xlParams
Set-Format -Range A10 -Value "Report Service" @xlParams
Set-Format -Range A19 -Value "Report Files"   @xlParams

# Close and Save the changes to the Excel file
# Launch the Excel file using the -Show switch
Close-ExcelPackage $excel -Show
Using the -StartRow parameter, you tell Export-Excel where to begin inserting the data.
The -TableName parameter is pretty powerful, it lets you name the area you just exported and it sets it up as an Excel Table. That gives you the zebra striping and dropdown arrows, which enables interactive data filtering.
The -AutoSize switch resizes the columns of the spreadsheet to fit the data that is in it.
The last data collection, Get-ChildItem, you do something a bit different. Using -PassThru it returns an object representing the Excel workbook that has been created. You store that in the variable $excel.
Using the $excel you can access the workbook properties, worksheets, and more. Here you set $ws to the worksheet Sheet1 $ws = $excel.Workbook.Worksheets['Sheet1'].
Now you can insert data using the Set-Format function, along with setting the font size, and bold attribute.
Don’t forget to use the Close-ExcelPackage, this saves your changes to disk. The -Show switch automatically launches Excel with the newly created Excel file.
I encourage you to explore the Excel PowerShell module, this is just scratching the surface of what is possible. Check out all of the Module Examples.
Bonus Feature
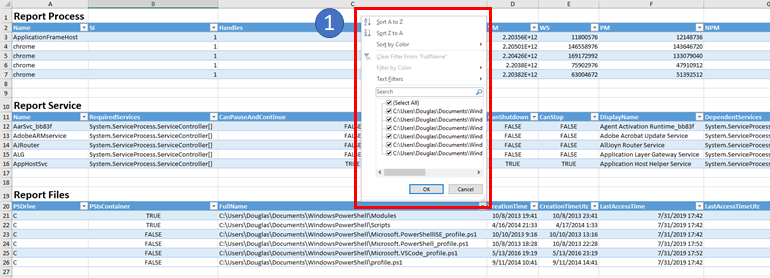
The -TableName parameter powerful, it lets you name the area you just exported and it sets it up as an Excel Table. That gives you the zebra striping and dropdown arrows, which enables interactive data filtering.
Plus, the filtering feature is applied to each property that was exported to Excel.
Here you can see item 1, clicking the dropdown arrow next to FullNanme in the Report Files section, it pops up dialog. In the dialog you can sort the data, or filter it in many ways. You also get a list of all the values in that column for that table and you can check off all the values you’d liked to see.

In Closing
Again, I encourage you to explore the Excel PowerShell module, this is just scratching the surface of what is possible, and the end results are great for presenting complex information for yourself, peers or management. Check out all of the Module Examples.
You can:
- Create charts
- Create pivot tables
- Create custom reports
- Do conditional formatting
- Join worksheets
- And so much more