PowerShell
PowerShell and GitHub Actions
PowerShell-and-GitHub-Actions
Focus on what matters: code
With GitHub Actions you can automate your workflow from idea to production.
Cycle Time: The time it takes from having and idea to putting it in the hands of your customers and providing value.
That’s one of the key reasons why we automate, and now, GitHub released GitHub Actions, another way to automate, and provide value to your customer.
In this post I’ll walk through setting up a GitHub Action in which I’ll use PowerShell and the new version of the Azure PowerShell Module to provision a web app in the cloud and deploy a simple, Hello World application. Once in place, you can focus on the code, and when you do a commit, the GitHub Action is triggered and deploys the fresh bits, ready to be used by your customers
Reference Links
A short list of links for more info.
- GitHub Actions
- From the course: GitHub Actions First Look
- Introducing GitHub Actions
- Cutting My Teeth on PowerShell Flavoured GitHub Actions
Must Haves
Here is what you must have in order to play along.
- Azure Account
- Azure service principal
- GitHub Account
- Sign up for the GitHub Actions Beta
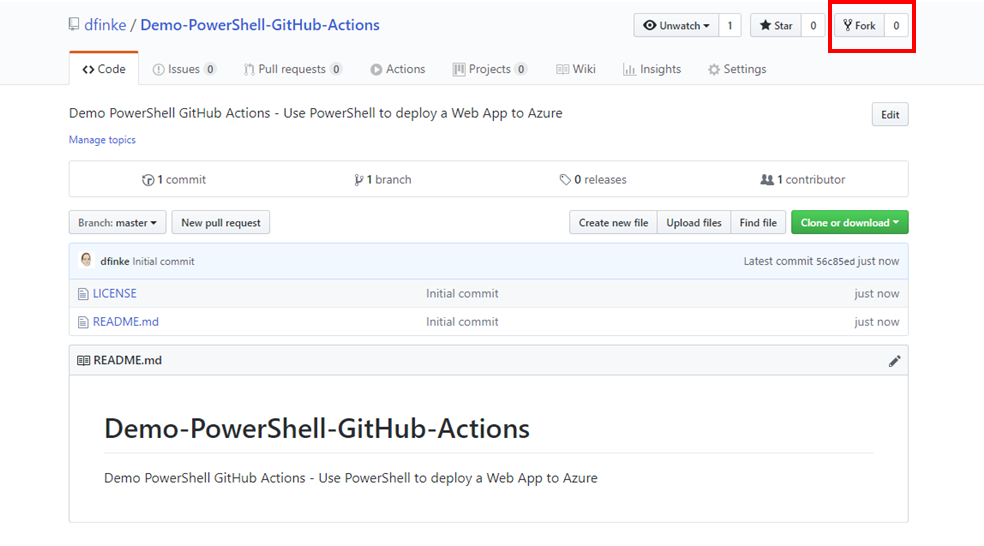
Step 1 - Fork the Repo
Head over to https://github.com/dfinke/Demo-PowerShell-GitHub-Actions. This demo repo has all you need to get started.
Click on the Fork button in the top right, once forked, got to Step 2.
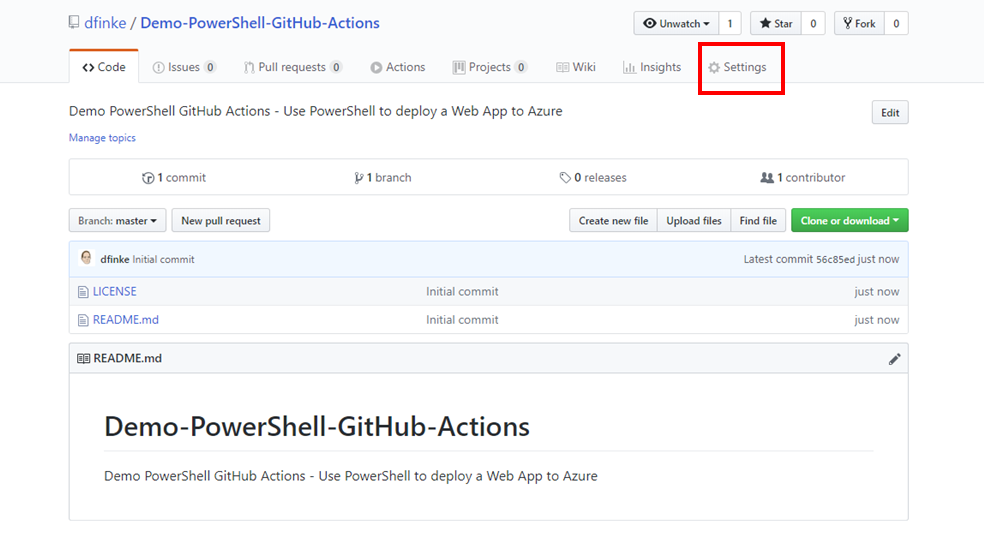
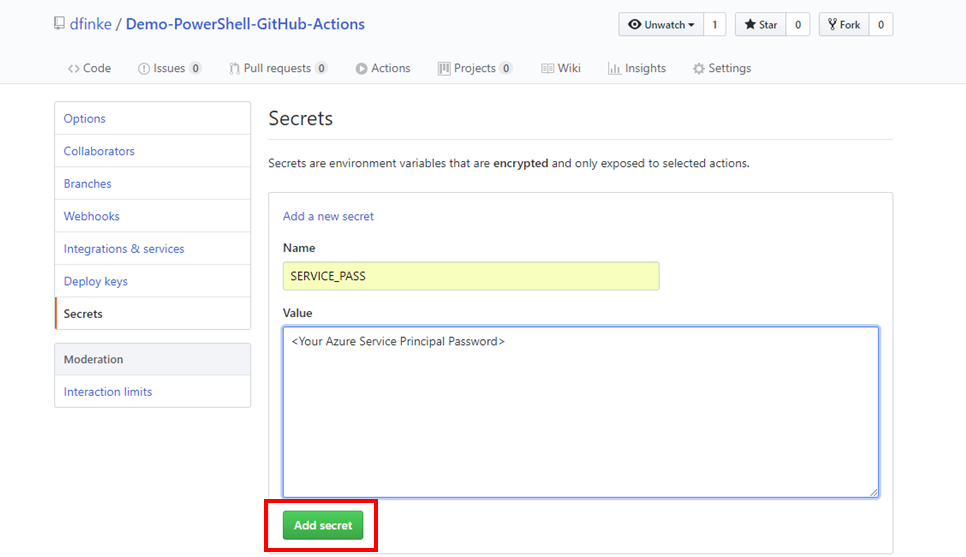
Step 2 - Create a Secret
Your GitHub Action will need a secret, this secret is the password you created for your Azure Service Principal. Click on settings, then Step 3.
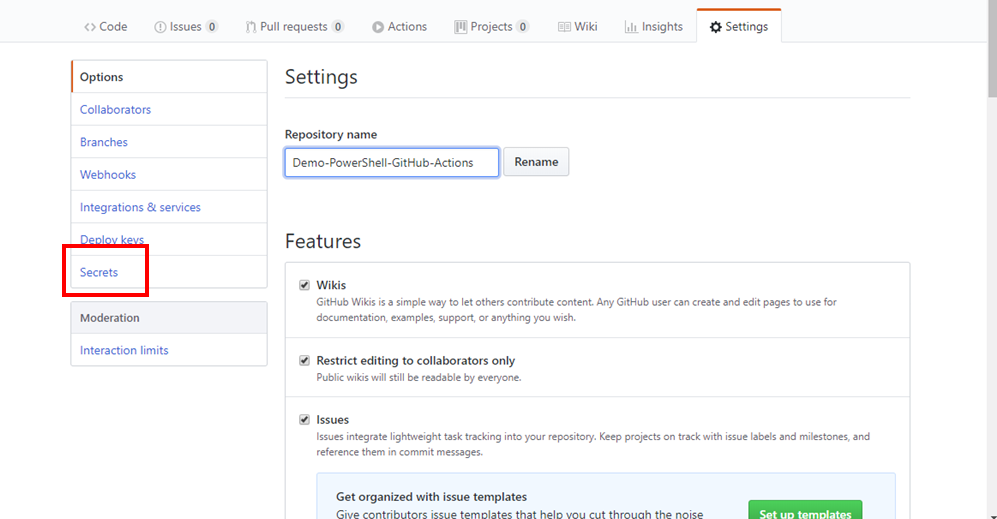
Step 3 - Click Secrets
Once in the Settings tab, on the left, click Secrets to go to where you can enter the key value pair, that’s Step 4.
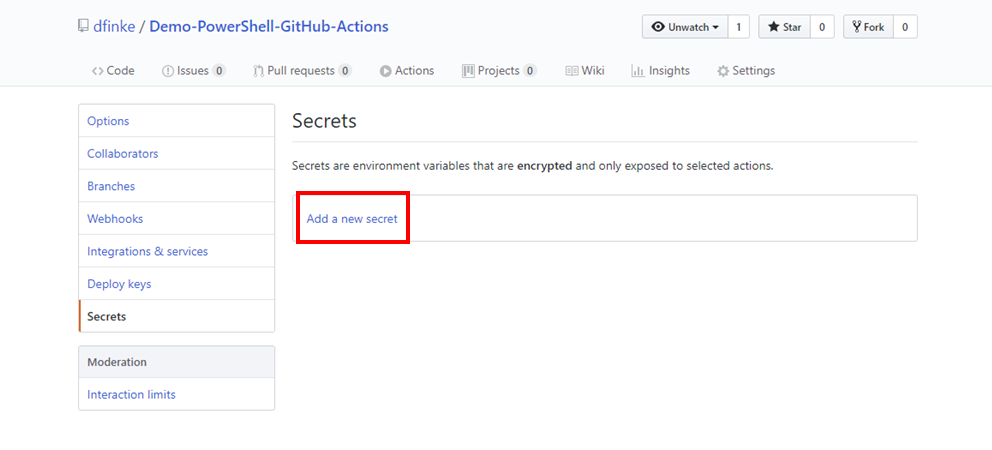
Step 4 - Add new secret
Click the Add new secret and you’ll get to the UI in Step 5.
Step 5 - Enter the secret
Name your secret SERVICE_PASS, you’ll see this specified in the main.workflow file. The value of this is the password you created for your Azure Service Principal.
Update the main.workflow
OK, almost there. There is one more setting needed to make the GitHub Action workflow come together, the TENANT_ID. This is in the output from creating Azure Service Principal.
From the GitHub page on the forked repo:
- click on
.github - click on
main.workflow - click on edit, the pencil icon on the right just above diagram canvas
- click on
<edit file>
Here is where you update the the TENANT_ID, and/or the other values in the env section.
Note: This TENANT_ID was provided when you created the Service Principal.
After making the edits, click the Start Commit button, then the Commit Changes button. After you do this. Click the Actions tab at the top, and your workflow should be scheduled shortly.
What do all these files mean?
Here we’ll walk though what makes up the key components of a GitHub Action.
Here is a sample repo with all the files and content you need to get this up and working.
For creating the Azure Service Principal, and using the UI to initialize the main.workflow check out the first part of this post Introducing GitHub Actions.
Note: This post is based on that. It was based on using the azure cli and this is the port to make it work all in PowerShell.
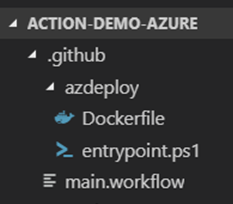
Directory Layout
Head over to the GitHub repo https://github.com/dfinke/Demo-GitHubActions-PowerShell-DeployAureWebApp. After reviewing, fork it add your Azure Service Principal Tenant ID and Password to see it in action.
Here’s the directory layout that the main.workflow will use you can see it in the uses key value pair in the next picture. The Dockerfile describes what runtime image is used in the action along with how to compose it and what to do when this all spins up.
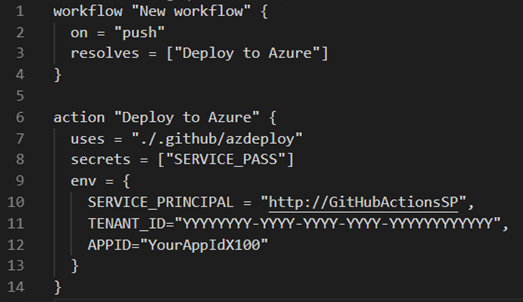
main.workflow - GitHub Actions
Here is the simple workflow that makes the provisioning and deployment start. This workflow, name New Workflow starts whenever a push is done to the GitHub repo. push is one of several events a workflow can respond to.
The resolves key points to the action named Deploy to Azure, line 6. You can think of this as a “Depends On”. The Deploy to Azure action does three things, tells it where to find the files to kick things off, passes in the secrets (you setup in the GitHub Action UI), and three environment variables are setup. All four of these values come from where you set up the Azure Service Principal. You’ll see these being used in the entrypoint.ps1.
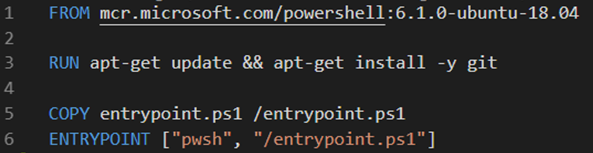
Dockerfile - It’s all about containers
Dockerfiles use a simple DSL which allows you to automate the steps you would normally manually take to create an image.
Here you
- (See line 1) Request an image, ubuntu, with PowerShell Core installed,
FROMstatement. - (See line 1) Update
apt-get(think PowerShellUpdate-Module) and install git (think PowerShellInstall-Module) - (See line 5) Copy the PowerShell file to the image
- (See line 6) Instruct what runs when the image gets spun up. Here, were are starting PowerShell Core with
.\entrypoint.ps1
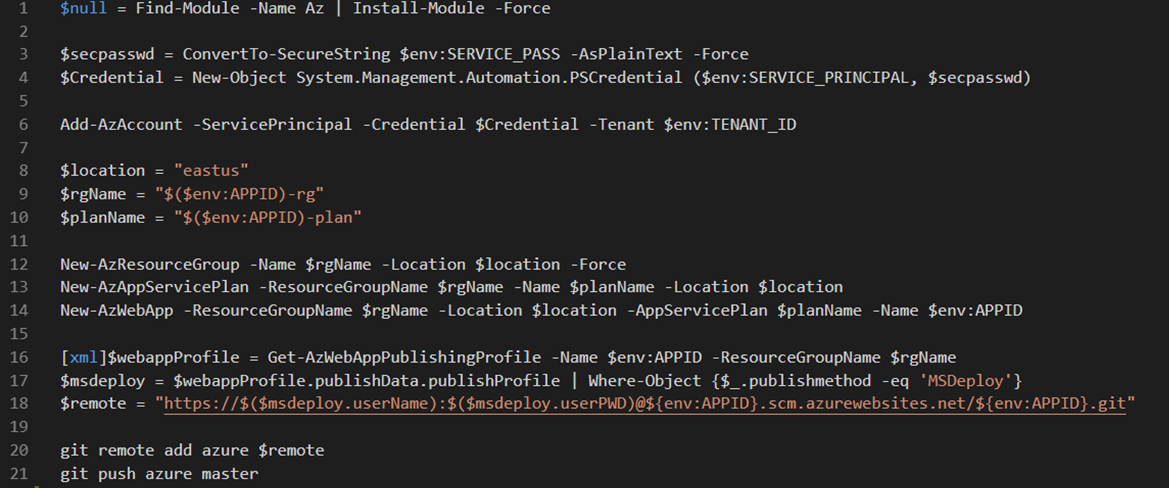
entrypoint.ps1 - The PowerShell
OK, you committed some changes to the repo, GitHub Actions got a push notification and it invokes the Dockerfile which boots ubuntu, installs software and calls pwsh when it starts and runs .\entrypoint.ps1.
Now, it’s all PowerShell. The following variables are setup in the environment from the main.workflow.
$env:SERVICE_PASS$env:SERVICE_PRINCIPAL$env:TENANT_ID$env:APPID
- These are used to create the credentials and logging into Azure as a Service Principal, see lines 3-6.
- Lines 8-10 creates variables for use in the remainder of the script. You need a resource group, app service plan name, and a name for the web app
$env:APPID. - Lines 12-14 use PowerShell functions to provision what is needed to house web application
Once provisioned, we need the auto generated userName and userPWD that is created in the web app profile. Line 16 pulls that info, it’s XML and you can use the PowerShell [XML] accelerator to create a DOM Document.
It returns two items, one is the MSDEPLOY creds and the other FTP. Line 17 finds the MSDEPLOY.
Line 18 forms the url and sets it to $remote. This is needed for the git remote add (line 20) so you can git push (line 21) the web application.
That’s it!
This one way to quickly get up and running with GitHub Actions. You can expand on the workflow and the PowerShell script to do whatever automation fits your needs. One of the things not covered in this post is using the GitHub Actions Workflow UI. Check out Introducing GitHub Actions for a walk through on that. I used that post as a basis for this, replacing it with a PowerShell approach.