PowerShell - Testing Your Scripts For v5 and v6
PowerShell, GitHub and Appveyor
UPDATE: Thanks to Chris Hunt who found that Appveyor just released PS v6.0. So the YAML build config can call it with the new
pwsh:section. eliminating the need to download and unzip V6. This reduced more moving parts and there is less to be concerned with.
In this post I’ll walk through how to use GitHub and Appveyor to quickly and easily run your PowerShell Pester tests in both v5 and V6 of PowerShell. This way you’ll have confidence in your scripts being able to run across versions.
You can create free accounts for both GitHub and Appveyor. Then, fork my repo and easily add it to your Appveyor to see it work.
You can check out a the CI Build Results.
GitHub is a website that hosts git, a version control system. Appveyor is a continuous integration solution for windows.
The Key
Two things need to happen to be able to run your Pester tests in Appveyor for both v5 and v6. PowerShell version 6 needs to be installed and then Pester needs to be installed from the PowerShell Gallery for both versions in order to run the tests.
That’s what this YAML config file instructs the Appveyor runtime to do.
.\DoTest.ps1 contains:
$PSVersionTable
Install-Module -Name Pester -Repository PSGallery -Force
Invoke-Pester
Continuous…
After you added your GitHub repo to your Appveyor projects, Appveyor will clone your repo and look for a appveyor.yml file which instructs it what to do. Here you can read more about the Appveyor Build Configuration.
Note: Going forward, every time you check in changes to your GitHub repo, GitHub will notify Appveyor, and it will automatically go to work cloning it and running the appveyor.yml file.
YML Sections
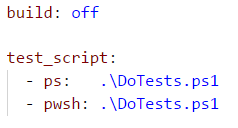
With Appveyor now providing support for v6 with the - pwsh: section, you can pass .\DoTest.ps1 to it and - ps:. This makes quick work of setup and testing of your scripts to see if the work across versions.
You can see the two primary sectons install and test_script. Appveyor will run these in order, similar to a build spec.
In the install section, the - ps: | section is a standard set of PowerShell. The first four lines sets up a couple of variables, removes the directory $path and then makes the directory $path. This is needed fot the Invoke-RestMethod which downloads the PowerShell v6.0 zip file, followed by Expand-Archive with unzips v6.0.
Good news, v5 and v6 can run side by side.
Now that v6 is installed, the yml file executes what is in the test_script: section. There are two sections - ps: |. They are identical except that the first one runs PowerShell v5 and the second one runs pwsh v6. Note it points to the direcory where you pulled and unzipped PS v6.
Each version of PowerShell are passed the same 3 lines. First is shows what version you’re running, next it installs Pester from the PowerShell Gallery and last it does an Invoke-Pester and runs the tests.
Note: These lines of script can be put into a .ps1 and called from the - ps: section. That is recommended. This was done this way for easy illustration.
The End
Here’s the results, you can see live results here:
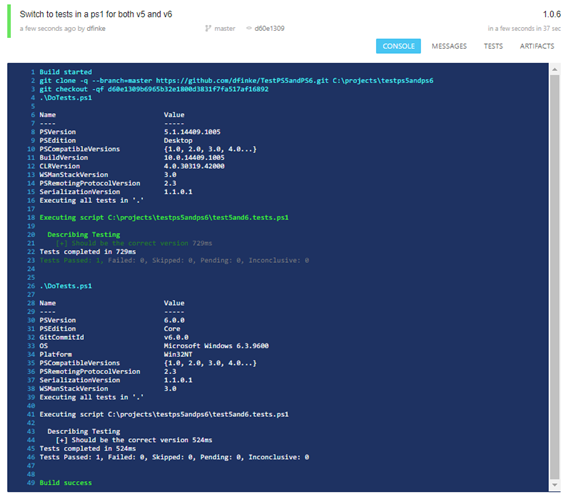
That’s all there is. It’s that simple. You can work on your local machine developing your PS scripts, testing them, switch between versions. Then, check them into the repo and Appveyor will automatically clone, install and run your tests across different versions of PowerShell.
Next up
Using a similar approach to test PowerShell scripts on Linux.